Accounts
The Accounts screen is the central place to manage every wallet that lives inside this StarKey installation. From here you can switch between accounts with a tap, create new main accounts and sub-accounts, import an existing wallet, rename or re-skin any account, and hide ones you do not use day-to-day.
Open the Accounts screen
Tap your avatar in the app bar (top-right on the Wallet tab) to open the Accounts screen.
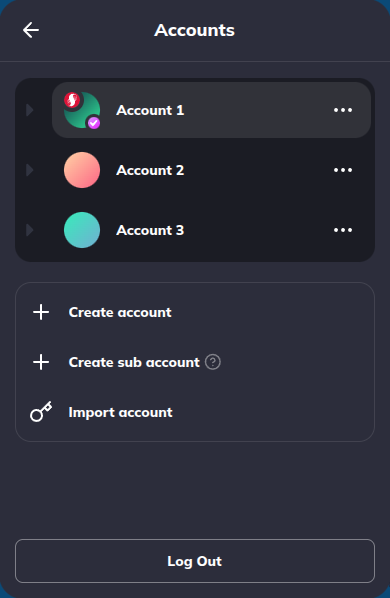
The list groups your wallets by type:
- Main accounts — Top-level accounts created from the StarKey onboarding flow. Each main account can hold sub-accounts derived from the same key material.
- Sub-accounts — Child accounts under a main account. Indented one level; the parent main account shows a chevron you can expand or collapse.
- Imported — Accounts brought in from a Secret Recovery Phrase, Private Key, or Split Key backup that does not match an existing main account.
- Hidden Accounts — A collapsible section at the bottom that surfaces only when at least one account is hidden.
Each row shows the avatar, account name, and the truncated address (e.g. 0x055f...9d1C). Tap a row to switch to that account; the wallet UI re-scopes to its balances, NFTs, and activity immediately.
Below the list, three action rows expose:
- Create New Account — Open the create-account flow for a new main account.
- Create Sub Account — Add a sub-account under an existing main account.
- Import Account — Import an existing wallet via Split Key, Secret Phrase, Private Key, or Hardware Wallet.
If you have only one main account, that account is preselected as the default for sub-account creation. When you create a new account or sub-account, StarKey auto-switches to it once the flow completes.
Create a new main account
A new main account is its own root — its sub-accounts are derived independently from any other main account on the wallet.
Tap Create New Account
From the Accounts screen, tap Create New Account.
Enter an account name
StarKey opens a single-screen prompt for the account name. The name is stored locally and never shared with StarKey or any third party. It becomes the name of your main account and the prefix used for its sub-accounts.
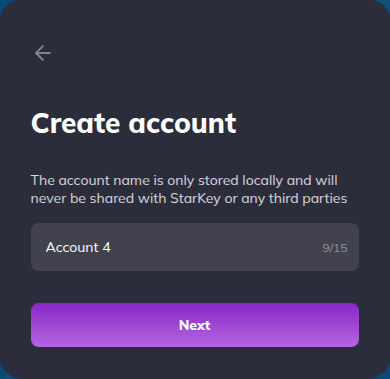
Type a name (e.g. Personal, Trading, DAO) and tap Next / Create.
You can rename any account later from Edit Account — see Edit account. The post-onboarding flow skips the password and Terms of Use steps because you already completed those when you installed the wallet.
Done
StarKey returns to the Accounts screen with the new account selected.
For the full onboarding flow (Split Key, Secret Phrase, or Private Key backup choice for a brand-new install), see Create Account.
Create a sub-account
Sub-accounts share the key material of their parent main account but expose a separate address per network.
Tap Create Sub Account
From the Accounts screen, tap Create Sub Account.
Pick a parent main account
The form opens with an Image preview at the top and a Main Account dropdown.
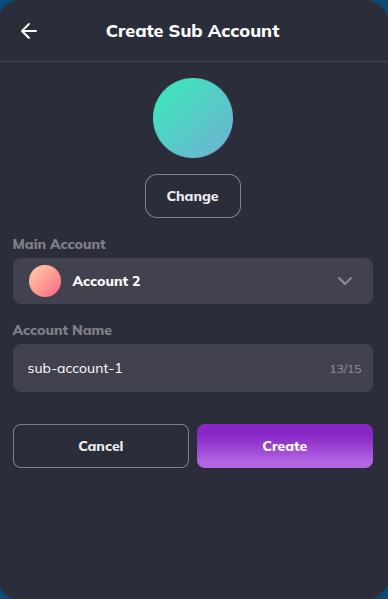
The dropdown defaults to the currently selected main account. Tap it to pick a different parent if you have more than one main account.
Enter a sub-account name
Type the sub-account name in the Account Name field. StarKey suggests a name prefixed with the parent (e.g. Personal 2), but you can override it. Inline feedback shows if the name is already taken or empty.
Tap Save
Tap Save to create the sub-account. Cancel discards everything.
StarKey returns to the Accounts screen with the new sub-account selected and listed under its main-account parent.
Import an account
Use Import Account to bring a wallet into this installation from a backup you already hold.
Tap Import Account
From the Accounts screen, tap Import Account.
Pick an import method
StarKey opens the Choose the importing methods screen with four cards:
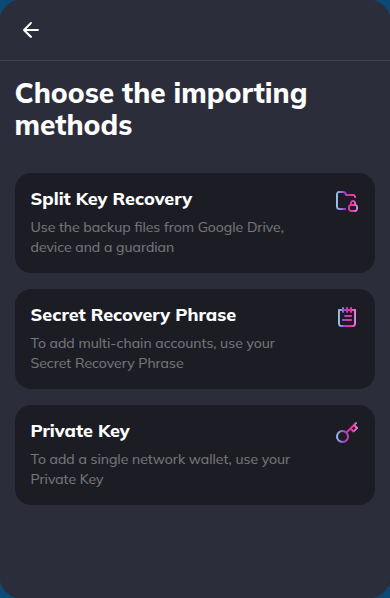
- Split Key Recovery — Use the backup files from Google Drive, device, and a guardian. Multi-chain.
- Secret Recovery Phrase — Use your 12 / 24-word phrase to add multi-chain accounts.
- Private Key — Use a single private key to add a single-network wallet.
- Hardware Wallet — Use multi-chain accounts from your hardware wallet.
Tap a card to enter that flow. For the screen-by-screen walkthrough of each method, see Import Account.
Confirm and import
Each method ends with an Account Name prompt — same shape as the create flow. Tap Next to finish; StarKey returns to the Accounts screen with the imported account listed under the Imported group.
Anyone with your Secret Recovery Phrase, Private Key, or Split Key backup files can spend from the imported account. Type secrets only when you are sure StarKey is the real app, and never share them over chat, email, or screen-share.
Edit an account
Edit covers the account avatar and name. The default avatar can be swapped for an NFT you own or a built-in image.
Open the More menu
Long-press an account row, or tap the ⋮ More icon next to it, to open the per-account dropdown. Options include Edit Account, Hide Account, and (for sub / imported accounts) Delete Account.
Tap Edit Account.
Change the name or image
The edit form shows the current avatar, a Change button beneath it, and an Account Name field.
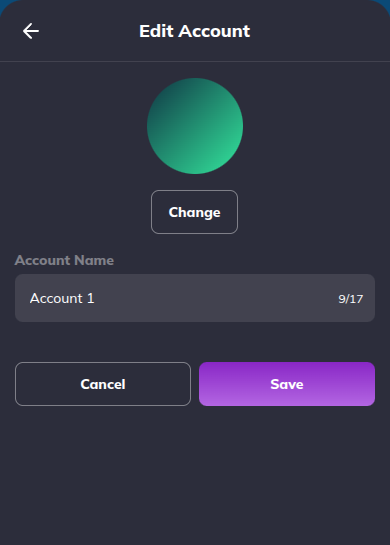
Type a new name, or tap Change under the avatar to open the image picker.
Pick an image
The image picker lists, in order:
- Current image — Always first.
- Your NFTs — Every NFT owned by this account, sized 70×70.
- Default avatars — Built-in fallback art.
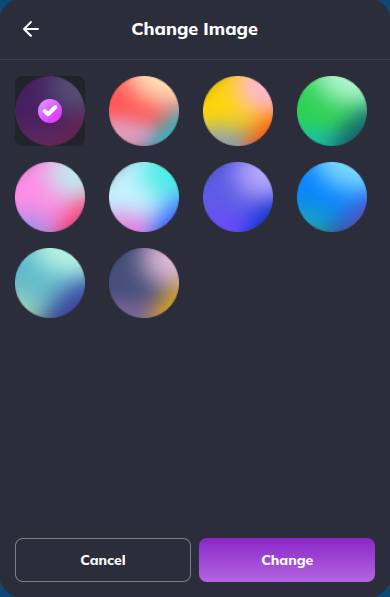
Tap an image to select it; the selected option carries a checkmark. Tap Save to apply, or Cancel to discard.
Save
Back on the edit form, tap Save to commit name and image changes. Cancel reverts both.
Sub-accounts and imported accounts have the same edit form. Main accounts cannot be deleted — only hidden — because deleting them would orphan their sub-accounts.
Hide and unhide accounts
Hiding removes an account from your active list without deleting its key material. Useful for accounts you have funded once and rarely touch (cold storage, escrow, retired projects).
Hide an account
Open the ⋮ More menu next to the account row and tap Hide Account. The row disappears from the active list and a toast confirms “The account is hidden”.
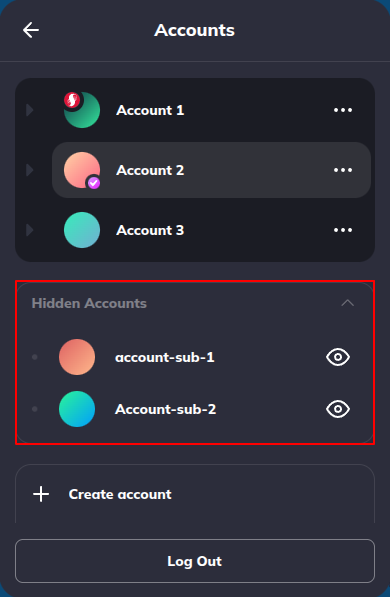
Hiding a main account also hides its sub-accounts. A hidden sub-account whose parent is still visible appears under Hidden Accounts as a row with the parent’s chevron disabled (greyed out).
Open Hidden Accounts
When at least one account is hidden, a Hidden Accounts row appears at the bottom of the list with a down-chevron. Tap to expand the collapsible section.
The expanded section lists each hidden account with an eye icon on the right.
Unhide
Tap the eye icon to unhide a single account, or open the row’s More menu for the same option. A toast confirms “The account is recovered” and the account returns to its original group.
Hiding is not deleting. The account, its key material, and its on-chain balance all stay intact — only the row is filtered out of the active list. To truly remove an imported account or sub-account, use Delete Account from the More menu. Main accounts cannot be deleted from inside the wallet.
Troubleshooting
- New account does not show up — Pull-to-refresh the Accounts screen, or close and re-open it. If it still does not appear, check the Hidden Accounts section — newly imported accounts inherit the visibility setting of the source backup.
- Cannot create a sub-account — A sub-account is derived from a main account, so at least one main account must exist first. Tap Create New Account to add one.
- “Account name already exists” — Sub-accounts inherit the parent’s name prefix; two sub-accounts under the same parent cannot share a name. Pick a different suffix.
- NFTs do not show in the Change Image picker — The picker reads the same NFT inventory as the NFTs tab. If an NFT is hidden under Manage NFT → Hide, unhide it first.
- Switched account but balances look stale — Some chains take a block or two to surface a new account’s state. Pull-to-refresh; if it persists, reopen the wallet.
- Lost access after hiding an account — Open Hidden Accounts, expand the section, and tap the eye icon to unhide. Hiding never deletes key material.