Tokens
StarKey treats the Tokens tab as your portfolio home. From here you can see total holdings across all chains, drill into a single token, manage which tokens are visible, request testnet funds from the Supra faucet, send tokens to any address, and inspect past transaction activity.
Portfolio overview
Open the Tokens tab from the bottom navigation. StarKey aggregates balances across every chain you have enabled and shows the total portfolio value in your selected display currency at the top of the screen.
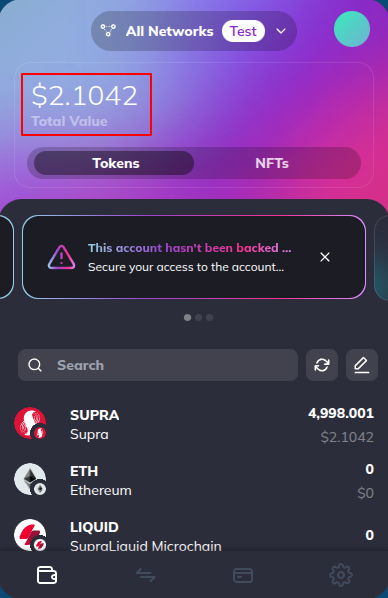
Each row in the list is a token holding:
- Icon + symbol — Token logo and short symbol (e.g.
SUPRA,ETH,USDC). - Balance — Native token balance.
- Fiat value — Balance multiplied by the live price (when price data is available).
- 24h change — Price delta over the last 24 hours.
Use the Network dropdown at the top-left to filter by a single chain, or leave it on All Networks for the aggregated view.
Some Supra tokens have no price feed yet. Those rows show only the native balance — fiat value and 24h change are hidden until a price source is wired up.
Price chart
Tap a token from the portfolio (or the price row on the token details page) to open its Price chart. The chart plots the token’s price over the selected timeframe so you can spot trends without leaving the wallet.
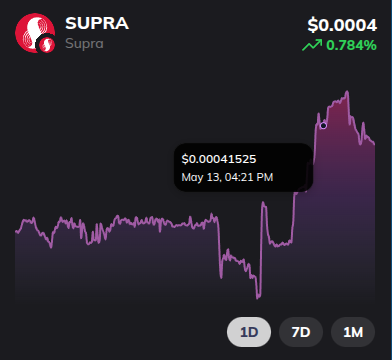
The chart view surfaces:
- Spot price — Current price in your display currency.
- Change indicator — Absolute and percentage change across the selected window (green for up, red for down).
- Sparkline / line chart — Price points across the timeframe. Drag along the chart on touch devices to scrub through individual data points.
- Timeframe dropdown — Switch the chart range. Typical options: 1H, 24H, 1W, 1M, 1Y, All. The default is 24H to match the change indicator shown in the portfolio list.
- External-link icon — Opens the canonical market page (e.g. CoinGecko, the project’s site) for deeper analytics.
Tokens without a price feed show “No price data available” instead of the chart. This is expected for newly listed Supra tokens — once a price source indexes them, the chart populates automatically.
View token details
Tap any token row to open its details screen. StarKey shows the asset card, the live price, and the activity history scoped to that single token.
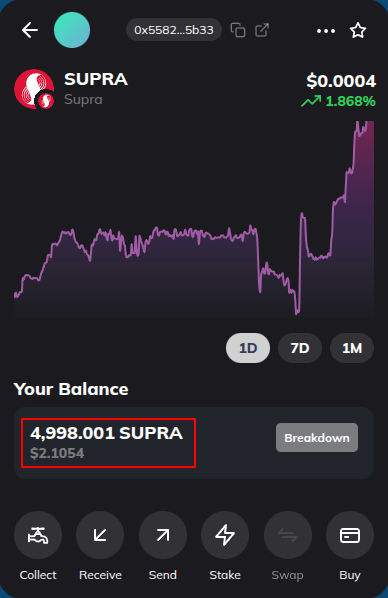
The page is organized into:
- Asset Card — Token icon, balance, fiat value, and the three primary actions (Send, Receive, Swap).
- Price — Spot price plus a sparkline / chart for the selected timeframe.
- Activity — Filterable history of transactions involving this token. Use the dropdown on the right to switch timeframe; tap the external-link icon next to the title to open the explorer view.
Manage tokens
Manage Tokens lets you toggle visibility on supported tokens or add a custom token by contract address.
Open Manage Tokens
From the Tokens tab toolbar, tap the Manage icon (or the more-menu → Manage Tokens). StarKey lists every token it knows about for the current network filter, each with a star toggle on the right.
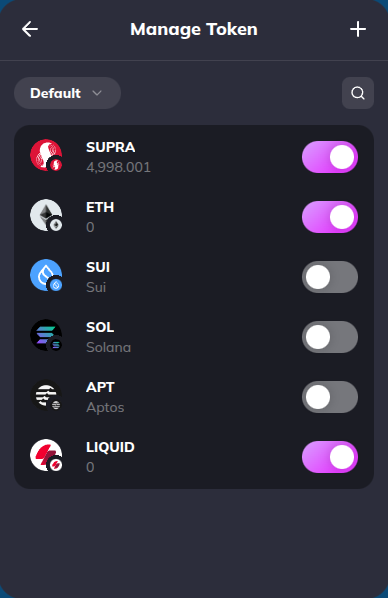
- Solid star — Token is visible in your portfolio.
- Outline star — Token is hidden; tap to add it.
Use the Network dropdown to scope by chain, or the Sort icon to reorder by name, balance, or recent.
Search a token
Tap the search icon. StarKey shows a Recommended list of the top 10 most popular tokens for quick add, plus a free-text search that matches by symbol or name. Pick the result and tap the star to include it.
Recommended only covers popular tokens StarKey has curated. The full token universe is much larger — use search or add a custom token if you do not see what you need.
Add a custom token
If a token is not in the supported list, tap the + (add) icon in the toolbar to open the custom-token form. Fill in:
- Network — Chain the token lives on.
- Contract address — Token contract address. StarKey auto-fetches the symbol and decimals when the address is recognized.
- Symbol — Short ticker (auto-filled when possible).
- Decimals — Token decimal precision (auto-filled when possible).
- Name — Optional friendly name.
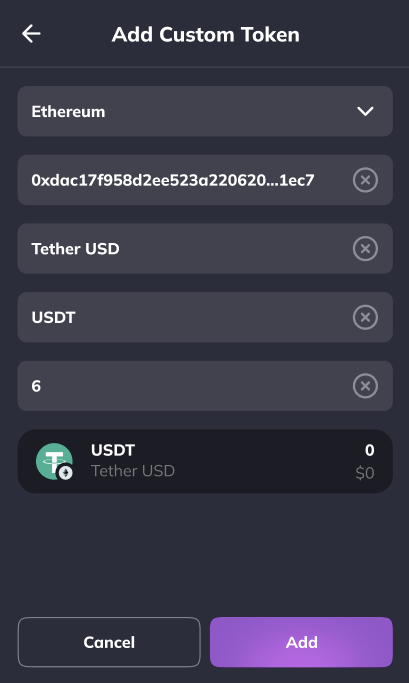
Tap Add to save. StarKey validates the contract address and the decimals — if either is malformed you will see an inline error before the token is added.
Anyone can deploy a token with any symbol. Always verify the contract address from the project’s official site or a trusted explorer before adding — and never approve large spend allowances on tokens you have not vetted.
Faucet (Supra testnet)
When you are on a Supra testnet, StarKey exposes a built-in faucet so you can request test SUPRA for development without leaving the wallet.
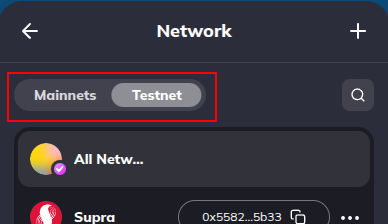
Switch to a Supra testnet
Use the network selector at the top of the wallet to pick a Supra testnet (e.g. Supra Testnet). Mainnets do not show the faucet action.
Open the faucet
Tap the Faucet action on the token card or the more-menu next to your SUPRA balance.
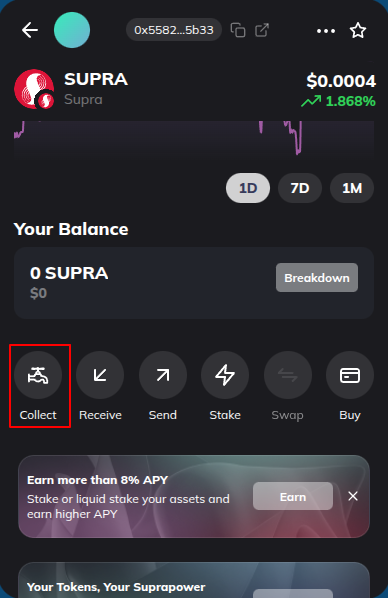
Request test SUPRA
Tap Request (or Drip). StarKey submits the request to the testnet faucet using your connected wallet address as the recipient. The faucet typically responds within a few seconds and your testnet balance updates on the next refresh.
Faucets are rate-limited — usually one drip per address per cooldown window (e.g. 24 hours). If a request fails with a “rate limited” message, wait for the cooldown or switch to a different testnet account.
Send tokens
Send tokens to any address on the same network. The flow is pick recipient → enter amount → review → confirm.
Start a send
From the portfolio (or a token details page) tap the Send action. StarKey opens the send flow with the current network and token pre-selected.
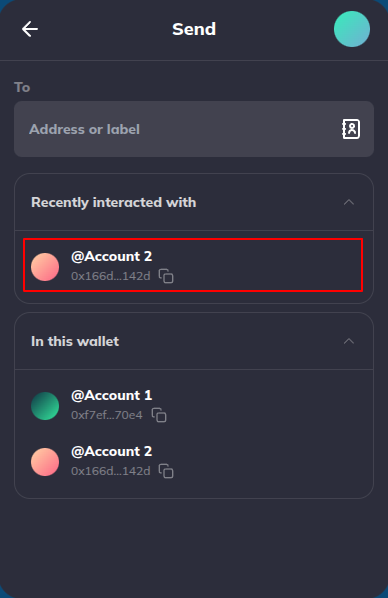
Choose token, network, and recipient
The first step asks for:
- Network — Defaults to the active network; change here if you want to send on a different chain.
- Token — Defaults to the token whose card you tapped; pick another from the dropdown.
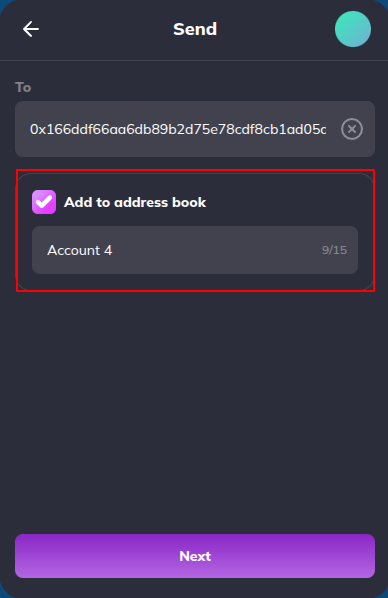
- Recipient — Paste or type the destination address, or pick a saved entry from your Address Book.
StarKey validates the recipient as you type — invalid addresses surface an inline error and the Next button stays disabled.
Enter the amount
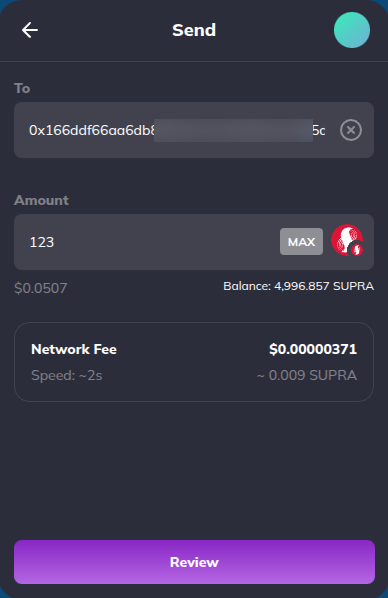
StarKey shows your available balance for the chosen token. Enter the amount in token units, or tap Max to send everything (minus the estimated network fee, when applicable).
Max sends your entire balance and leaves nothing for future gas. If you want to keep some native token for future fees, enter the amount manually.
Pick the network fee
Tune the network fee:
- Slow — Cheapest, longest confirmation time.
- Standard (default) — Balanced.
- Fast — Highest priority, fastest confirmation.
- Custom — Set gas / fee parameters yourself (advanced).
Review and confirm
StarKey opens the Send Review screen with every parameter laid out:
- Amount being sent (token + fiat).
- Recipient address.
- Network and token.
- Estimated network fee.
- Total deducted from your balance.
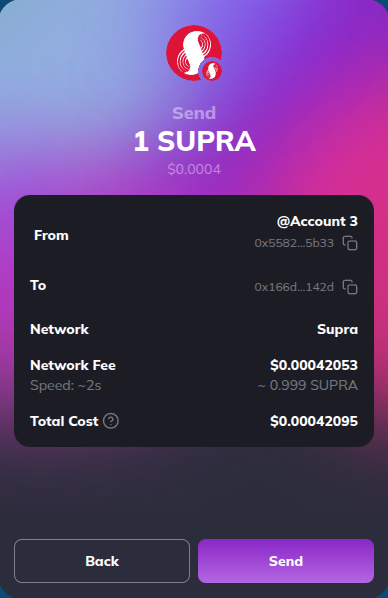
Tap Confirm to sign and broadcast. Cancel drops you back to the amount screen with values preserved so you can adjust.
Once the transaction is broadcast, it cannot be cancelled or reversed. Always double-check the recipient address and network — funds sent to a wrong chain or wrong address are typically unrecoverable.
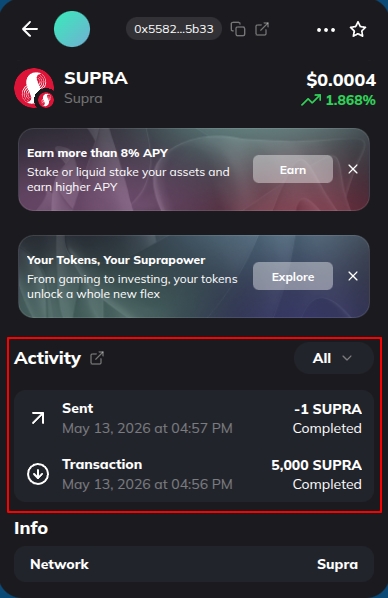
Activity on the token details page
After signing, open the token from the portfolio to view its Activity section on the token details page. The page header shows the asset card with the Send badge, the signed amount (negative for outgoing), and the fiat value at the time of the transaction.
Below the asset card, the Activity list shows the new transaction at the top:
- Pending immediately after broadcast — the row carries a spinner and the Pending status badge.
- Completed once the network mines the transaction — the badge flips to Completed and the timestamp finalizes.
- Failed if the network rejects it — tap the row to read the failure reason and re-try.
Tap the row to drill into the transaction detail (hash, block, fee, counterparty) or use View on explorer to open the canonical block explorer.
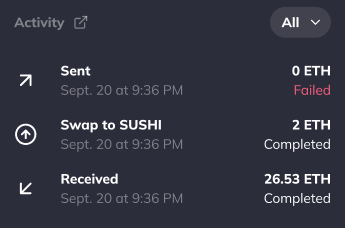
Transaction activity
The Activity tab (or the activity section on any token details page) lists every transaction the wallet has signed or received.
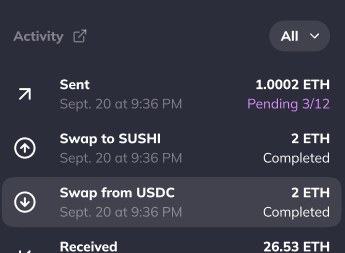
Each row shows:
- Direction icon — Up-right arrow for outgoing, down-left for incoming, swirl for swap.
- Action —
Send,Receive,Swap,Contract,Approve, etc. - Token + amount — Signed value (negative for outgoing).
- Fiat value — When price data is available.
- Status —
Pending/Completed/Failed. - Timestamp — Local time of the transaction.
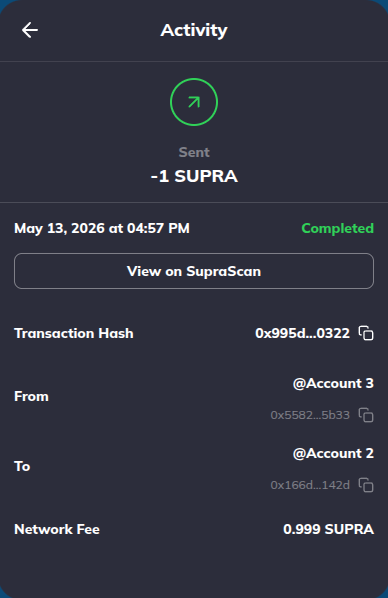
Tap a row to open the transaction details view:
The detail page surfaces:
- Direction icon (up-right for send, down-left for receive).
- Amount with sign and fiat value.
- Row list with: hash, block, fee paid, counterparty address, timestamp.
- A View on explorer button that opens the canonical block explorer URL for the network.
Pending transactions can take seconds (Supra) to minutes (Ethereum) to confirm. If a transaction stays pending for much longer than the network average, check the block explorer — the transaction may have been dropped from the mempool and needs to be re-broadcast.
Troubleshooting
- Balance shows zero but I just received funds — Pull-to-refresh the Tokens tab, or wait one block confirmation. Some chains take longer to surface new balances.
- Token is not in the supported list — Use Manage Tokens → Add custom token with the verified contract address from the project’s official source.
- Faucet request fails with “rate limited” — Wait for the per-address cooldown to expire, or request from a different testnet account.
- Send button greyed out — Recipient address is invalid, amount exceeds available balance, or you are missing native token to cover the network fee.
- Transaction stuck on Pending — Check the block explorer using the activity detail’s View on explorer link. If the transaction was dropped, broadcast a replacement with a higher fee.